利用.9图做背景,配合使用popwindow和listview可以实现这个需求,也可以自定义popwindow的布局,画边框加阴影,自定义三角形的view,然后…然后我就放弃了这个思路,老老实实直接让设计师给我切图了。andriod开发中写个阴影都要几十行xml代码,不像H5开发,一行css代码搞定了,反正我是受不了,怎么方便怎么来。
最终效果图如下: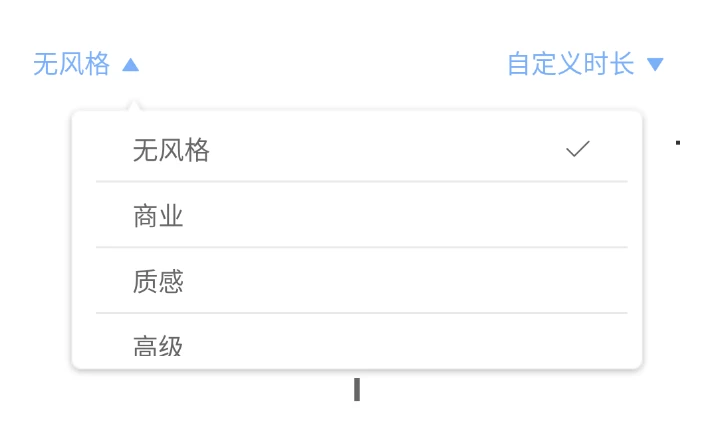
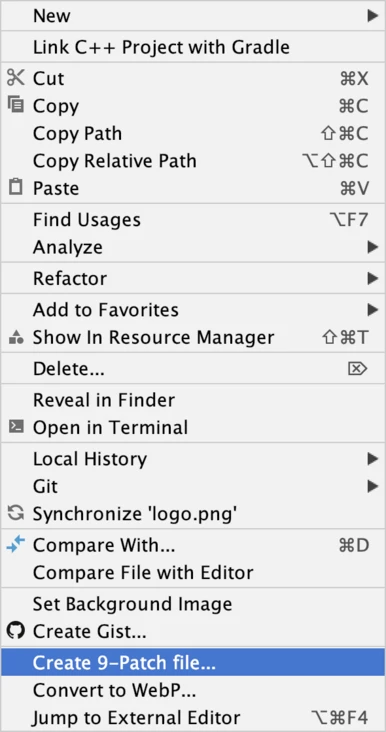
直接把切好的图(png格式)放进对应的drawable文件(分辨率不同)中,然后右键png文件,选中create 9-patch file这个选项,进入.9图编辑
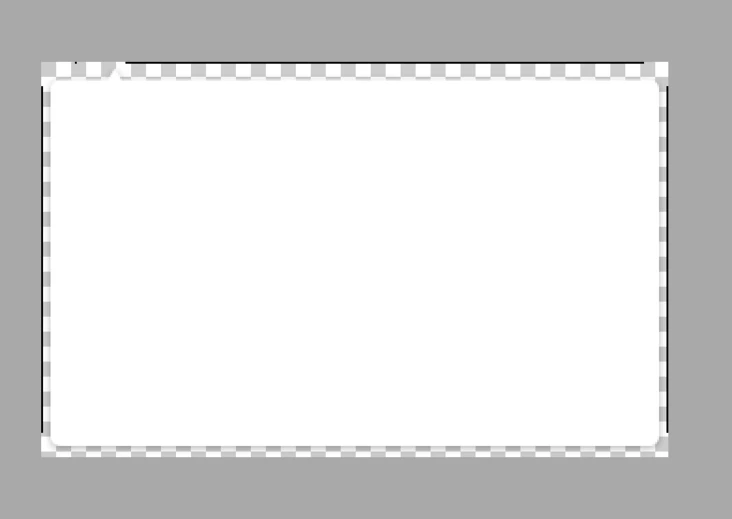
其实.9图就是适应图片在各个可能拉伸变形的情景中用的
编辑四条边,该拉伸的地方调整一下,不希望它拉伸的地方不要选中,就ok了
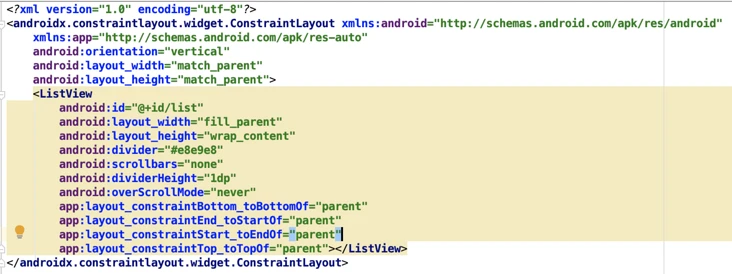
- 创建popwindow布局文件
1
2
3
4
5
6
7
8
9
10
11
12
13
14
15
16
17
18
19
<?xml version\="1.0" encoding\="utf-8"?>
<androidx.constraintlayout.widget.ConstraintLayout xmlns:android\="http://schemas.android.com/apk/res/android"
xmlns:app\="http://schemas.android.com/apk/res-auto"
android:orientation\="vertical"
android:layout\_width\="match\_parent"
android:layout\_height\="match\_parent"\>
<ListView
android:id\="@+id/list"
android:layout\_width\="fill\_parent"
android:layout\_height\="wrap\_content"
android:divider\="#e8e9e8"
android:scrollbars\="none"
android:dividerHeight\="1dp"
android:overScrollMode\="never"
app:layout\_constraintBottom\_toBottomOf\="parent"
app:layout\_constraintEnd\_toStartOf\="parent"
app:layout\_constraintStart\_toEndOf\="parent"
app:layout\_constraintTop\_toTopOf\="parent"\></ListView\>
</androidx.constraintlayout.widget.ConstraintLayout\> - 在相应的页面文件(activity)中初始化popwindow
1 | // 初始化popwindow |
大概流程就是用LayoutInflater拿到popwindow的布局实例,从布局实例view中找到listview,初始化listview的数据,实例化adapter,adapter里面自定义了每个item的布局,所以还要有一个pop_window_item的布局文件,然后把布局内容塞给PopupWindow实例对象,设置item的监听回调,处理一些业务逻辑,监听popwindow消失的事件,里面主要处理icon的状态、让listview重新回到顶部(post到ui线程中渲染)。
给FontIconView动态设置内容的时候,setText必须要传unicode码,xml是有处理unicode的能力的,但是动态设置的时候,不能传字符串,比如:
,正确的写法应该是\ue6b8
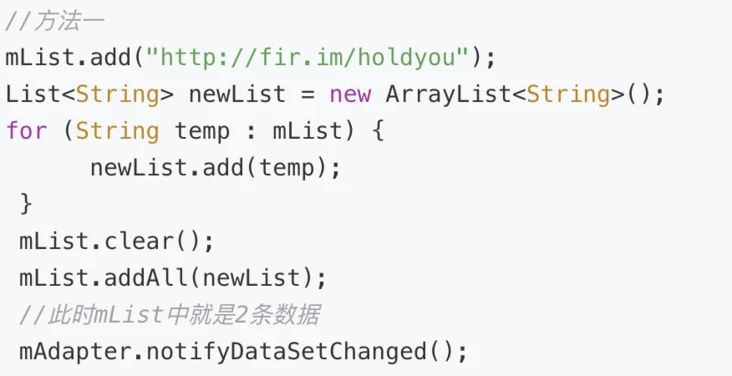
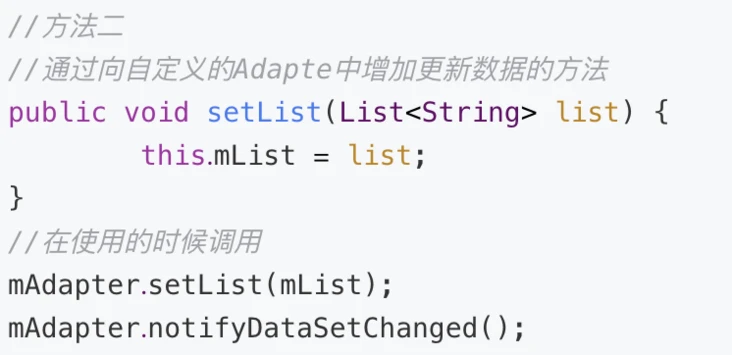
- 还有一个需要注意的是:点击改变list数据,让listview重新绘制popwindow的内容,不能直接改变数组的引用,让后adapter.notifysetdatachange(),而是要先清空原有的数组内容,然后add或者addAll进去新的值,然后mAdapter.notifyDataSetChanged()才会有效,例如:或者还有一种方法,adapter里面可以写个方法让外部调用,比如叫setData,里面负责给adapter里面要渲染的数据重新赋值,然后外面调用这个方法,传入新的值,最后mAdapter.notifyDataSetChanged()
1
2
3
4
5
6
7
8
9
10
11
12
13
14
15
16
17
18
19
20
21
22
23
24
25
26
27
28
//视频时长下拉选择
@OnClick(R.id.select\_time)
public void selectTime() {
mList.setBackground(this.getDrawable(R.drawable.pop\_window\_bg\_right));
this.currList \= TIME\_LIST\_CODE;
direction\_icon\_right.setText("\\ue6be");
List<PopWindowSelectItem> newList = new ArrayList<>();
for (int i = 0; i< timeList.length;i++) {
PopWindowSelectItem popSelectItem = new PopWindowSelectItem();
popSelectItem.setName(timeList\[i\]);
if (i != selectTimeIndex) {
popSelectItem.setSelect(false);
}else {
popSelectItem.setSelect(true);
}
newList.add(popSelectItem);
}
popListData.clear();
popListData.addAll(newList);
mAdapter.notifyDataSetChanged();
//计算显示的位置
View parent = LayoutInflater.from(VideoProfessionalClipActivity.this).inflate(R.layout.activity\_video\_professional\_clip,null);
int\[\] location = new int\[2\];
style.getLocationOnScreen(location);
int top = location\[1\] + DensityUtil.dip2px(VideoProfessionalClipActivity.this,35);
mPopupWindow.update();
mPopupWindow.showAtLocation(parent,Gravity.TOP,0,top);
}
- 贴上adapter的代码
1
2
3
4
5
6
7
8
9
10
11
12
13
14
15
16
17
18
19
20
21
22
23
24
25
26
27
28
29
30
31
32
33
public class VideoClipPopWindowAdapter extends BaseAdapter {
private List<PopWindowSelectItem> datas;
private Context context;
public VideoClipPopWindowAdapter(Context context, List<PopWindowSelectItem> datas) {
this.context \= context;
this.datas \= datas;
}
public int getCount() {
return datas.size();
}
public Object getItem(int position) {
return datas.get(position);
}
public long getItemId(int position) {
return position;
}
public View getView(int position, View convertView, ViewGroup parent) {
convertView = LayoutInflater.from(context).inflate(R.layout.video\_clip\_popwindow\_item, null);
TextView tv = (TextView) convertView.findViewById(R.id.popwindow\_item\_text);
TextView icon = convertView.findViewById(R.id.popwindow\_item\_icon);
if (datas.get(position).isSelect()) {
icon.setVisibility(View.VISIBLE);
}else {
icon.setVisibility(View.INVISIBLE);
}
tv.setText(datas.get(position).getName());
return convertView;
}
} - 最后记录一下自定义展示popwindow的位置怎么实现
1
2
3
4
5
6
7
//计算显示的位置
View parent = LayoutInflater.from(VideoProfessionalClipActivity.this).inflate(R.layout.activity\_video\_professional\_clip,null);
int\[\] location = new int\[2\];
style.getLocationOnScreen(location);
int top = location\[1\] + DensityUtil.dip2px(VideoProfessionalClipActivity.this,35);
mPopupWindow.update();
mPopupWindow.showAtLocation(parent,Gravity.TOP,0,top);showAtLocation第一个参数传入父节点的view实例,但是还想不管传什么,他都会找到root节点,目前不知道具体有什么区别,反正我是把当前页面的布局转换成view实例传进去了,也是root节点吧,第二个参数就是传入popwindow在页面中显示的位置,3,4传入具体的x,y值getLocationOnScreen可以获取到具体的view在屏幕中的具体坐标,参数是int数组,第一位是x,第二位是y,会通过回调的方式返回给你,拿到你想参考的view的坐标就可以定位popwindow的位置了,我是参考了style的top值加上他本身的高度,就能定位了。
安卓开发任重道远~
我很可爱,请给我钱


若没有本文 Issue,您可以使用 Comment 模版新建。
GitHub IssuesGitHub Discussions