前言

ios用户当更新到iOS14后,我们的iPhone等ios设备支持我们用户自定义桌面小物件(又或者称之为小组件、桌面挂件),利用这个特性,网上出现了许许多多诸如透明时钟、微博热搜、知乎热榜、网易云热评、特斯拉、BMW、名爵、奥迪等等的iPhone桌面,看如下实际效果图:

那这到底是怎么实现的,我们怎么才能制作一款自己的iPhone个性桌面?今天给大家分享的就是Scriptable的桌面玩法,对于javascript开发人员来说,看完这篇教程,上手小物件开发应用是信手拈来的事儿,而对于没有编程基础的同学不用担心看不懂,你所要做的就是复制粘贴,直接跳过开发教程,看文章末尾快速通道即可。

Scriptable介绍

这是一款可让您使用 JavaScript 自动化构建 iOS 的应用程序

以上是对Scriptable的官方解释,这对前端开发者来说无疑是一个福音,因为Scriptable 使用 Apple 的JavaScriptCore,它默认就支持ECMAScript 6对小组件进行开发构建。

如果您刚刚开始使用 JavaScript,您可能想看看 Codecademys Intro to Programming in JavaScript。有关 JavaScript 功能的快速参考,您可以参考 W3Schools 的JavaScript 教程

请注意,一些指南和教程会假设您在浏览器中运行 JavaScript,因此可以访问特定于浏览器的对象,例如文档。Scriptable 不在浏览器中运行 JavaScript,因此不存在此类对象。

更多对于Scriptable的解释请阅读官方文档

关键特性

先看一张图:

上面列举的是一些Scriptable的特性,这些特性包括:

  • 支持ES6语法
  • 可以使用JavaScript调用一些原生的API
  • Siri 快捷方式
  • 完善的文档支持
  • 共享表格扩展
  • 文件系统继承
  • 编辑器的自定义
  • 代码样例
  • 以及通过x-callback-url和其它APP交互

是不是感觉支持的特性还是挺多的,这些特性已经足够让我们去实现很多原生级底层的交互了。

第一个小物件程序

1
2
3
4
5
6
7
8
9
10
11
12
13
14
15
16
17
18
19
20
21
22
23
24
25
26
// 判断是否是运行在桌面的组件中
if (config.runsInWidget) {
// 创建一个显示元素列表的小部件
// 显示元素列表的小部件。将小部件传递给 Script.setWidget() 将其显示在您的主屏幕上。
// 请注意,小部件会定期刷新,小部件刷新的速率很大程度上取决于操作系统。
// 另请注意,在小部件中运行脚本时存在内存限制。当使用太多内存时,小部件将崩溃并且无法正确呈现。
const widget = new ListWidget();
// 添加文本物件
const text = widget.addText("Hello, World!");
// 设置字体颜色
text.textColor = new Color("#000000");
// 设置字体大小
text.font = Font.boldSystemFont(36);
// 设置文字对齐方式
text.centerAlignText();
// 新建线性渐变物件
const gradient = new LinearGradient();
// 每种颜色的位置,每个位置应该是 0 到 1 范围内的值,并指示渐变colors数组中每种颜色的位置
gradient.locations = [0, 1];
// 渐变的颜色。locations颜色数组应包含与渐变属性相同数量的元素。
gradient.colors = [new Color("#F5DB1A"), new Color("#F3B626")];
// 把设置好的渐变色配置给显示元素列表的小部件背景
widget.backgroundGradient = gradient;
// 设置部件
Script.setWidget(widget);
}

通过以上简单的显示”Hello, World!”并设置背景色和文字样式的程序来看,有一个重要的概念需要javascript程序员去理解和从传统的web开发的概念中转换过来,如果你之前有开发过Flutter开发经验的话,那么对你来说,开发Scriptable应用应该是有共鸣的。因为对于我看来,Scriptable同样也是万物皆组件(widget)的概念,支撑这一点的一个重要思想就是面向对象。

万物皆组件

何为万物皆组件?无论是容器(div)还是样式(color、style)还是元素(font)等等全是Object,比如你要显示一行文字”Hello, World!”,那么你首先必须要有一个容器(div)去装载这行文字(fonts),你还要去给文字设置样式(styles),那样式也不是说凭空生成,凡是对象,都要new出来。对照以上”Hello, World!”的例子再深入理解这个概念。

以上概念对Scriptable应用开发有极其重要的积极作用,尤其是对于初级前端开发者或没有原生app开发经验的开发者来说,他们很难脱离传统web这种mvvc或者mvc的开发模式去思考面向对象的开发模式。

高频常用的组件

ListWidge

显示元素列表的小部件,最常用的容器组件。一般组件应用的根元素都用ListWidget包裹,也只有用这个组件才能传递给 Script.setWidget() 将其显示在您的主屏幕上。

请注意,小部件会定期刷新,并且小部件刷新的速率很大程度上取决于操作系统。注意:利用这一点可以做很多需要基于定时刷新的应用,比如:节日纪念日,需要计算当前时间的应用。

另请注意,在小部件中运行脚本时存在内存限制。当使用太多内存时,小部件将崩溃并且无法正确呈现。

-addStack

addStack(): WidgetStack

添加堆栈。

ListWidget.addStack()返回值是WidgetStack(堆栈元素),将堆栈元素添加到ListWidget中是水平布局的,可以利用这个api实现类似于flex布局

-addSpacer

addSpacer(length: number): WidgetSpacer

向小部件添加间隔。这可用于在小部件中垂直偏移内容。类似于web开发中css的margin

-setPadding

setPadding(top: number, leading: number, bottom: number, trailing: number)

设置小部件每一侧的填充。类似web中css的padding

-addText

addText(text: string): WidgetText

将文本元素添加到小部件。使用返回元素的属性来设置文本样式。类比web开发中的向div中插入文本节点。

backgroundColor

backgroundColor: Color

设置容器的背景颜色,值必须是Color类型(new Color('#fff', 1)),Color构造函数的第一个参数为色值,第二个参数为透明度,类似web开发中的rgba(255,255,255,1)

backgroundImage

backgroundImage: Image

设置容器的背景图片。类似web中css的backgroud-image

Font

表示字体和文本大小。

new Font(name: string, size: number)

该字体可用于设置文本样式,例如在小部件中。

- regularSystemFont

创建常规系统字体。

static regularSystemFont(size: number): Font

-lightSystemFont

创建白天模式系统字体。

static lightSystemFont(size: number): Font

-thinSystemFont

创建细系统字体。

static thinSystemFont(size: number): Font

Keychain

钥匙串是凭据、密钥等的安全存储。使用该set()方法将值添加到钥匙串。然后,您可以稍后使用该get()方法检索该值。

-contains

检查钥匙串是否包含钥匙。

static contains(key: string): bool

检查钥匙串是否包含指定的钥匙。

-set

将指定键的值添加到钥匙串。

static set(key: string, value: string)

将值添加到钥匙串,将其分配给指定的键。如果密钥已存在于钥匙串中,则该值将被覆盖。

值安全地存储在加密数据库中。

-get

从钥匙串中读取一个值。

static get(key: string): string

读取指定键的值。如果密钥不存在,该方法将引发错误。使用该contains方法检查钥匙串中是否存在钥匙。

Alert

显示模态弹窗。类似web ui中的Modal组件

使用它来配置以模态或表单形式呈现的弹窗。配置弹窗后,调用 presentAlert() 或 presentSheet() 以呈现弹窗。这两种表示方法将返回一个值,该值携带完成时选择的操作的索引。比如你弹窗添加了两个操作按钮,先添加一个是确定,另一个是取消按钮,添加操作跟js中的数组一致,先添加的按钮索引就是 0,当用户点击确认按钮的时候,alert.presentAlert()返回的值就是’确认’在配置数组中的索引值,即为0。

个人认为这个组件也是非常高频的组件,因为在高级桌面组件或者复杂的组件,尤其是一些需要用户登录账号信息的桌面组件来说,需要弹窗让用户输入账号密码等交互行为,又或者让用户输入日期、名称等需要持久化存储的场景,Alert组件是不二之选。

-message

title: string

弹窗中显示的标题。通常是一个短字符串。

-addAction

向弹窗中添加操作按钮。要检查是否选择了某个操作,您应该使用在 presentAlert() 和 presentSheet() 返回的Promise时提供的第一个参数。

1
2
3
4
5
6
7
8
9
10
11
// 创建一个弹窗组件
let alert = new Alert();
// 设置弹窗中显示的content
alert.message = '弹窗中显示的内容,这里可以展示对操作的解释等文案信息...';
// 向弹窗中加入一个按钮-确定,索引为0
alert.addAction('确定');
// 向弹窗中加入一个按钮-取消,所以为1
alert.addAction('取消');
// 获取弹窗按钮被触发后拿到用户点击的具体某个按钮索引,如果点击确定,response === 0 否则 response === 1
let response = await alert.presentAlert();

-addCancelAction

addCancelAction(title: string)

向弹窗中添加取消操作。选择取消操作时,kidealert()或vistentheet()提供的索引将始终为-1。请注意,在 iPad 上运行并使用 presentSheet() 进行演示时,该操作不会显示在操作列表中。通过在工作表外点击可取消操作。

弹窗只能包含一个取消操作。尝试添加更多取消操作将删除之前添加的任何取消操作。

-presentAlert

显示模态弹出窗,类似elementuimodalvisible设置为true,此时弹窗显示。

-presentSheet

将弹窗以类似bottomSheet交互方式弹出。

Image

管理图像数据。

图像对象包含图像数据。Scriptable 中处理图像的 API(通过将图像作为输入或返回图像)将使用此 Image 类型。

-size

size: Size

图像的大小(以像素为单位)。只读

-fromFile

从指定的文件路径加载图像。如果无法读取图像,该函数将返回 null。类似web开发中读取本地(ios中还有iCloud)图片文件

-fromData

static fromData(data: Data): Image

从原始数据加载图像。如果无法读取图像,该函数将返回 null。

Data可以是字符串、文件和图像的原始数据表示。例如,Image中用的比较多的就是从base64字符串中读取图片,伪代码示例如下:

1
2
3
4
5
6
let imageDataString = 'base64:xxxxx'
let imageData = Data.fromBase64String(imageDataString)
// Convert to image and crop before returning.
let imageFromData = Image.fromData(imageData)
// return Image(imageFromData)
return imageFromData

更多关于Data的其他api请参考文档

Photos

提供对您的照片库的访问。

为了从您的照片库中读取,您必须授予应用程序访问您的照片库的权限。首次使用 API 时,应用会提示访问,但如果您拒绝请求,所有 API 调用都会失败。在这种情况下,您必须从系统设置中启用对照片库的访问。

这个api用的也是相对高频的一个,因为大部分场景下,你的widget都需要用到图片或者背景,而使用图片的大部分场景(特别是背景图)都需要访问你的设备图库,也就是你的相册,当然使用相册功能必须在用户授权的前提下。

-fromLibrary

static fromLibrary(): Promise<Image>

显示用于选择图像的照片库,使用它从照片库中挑选图像。

使用它:

1
2
const img = await Photos.fromLibrary();
// 拿到Image对象后,可以对它做缓存、展示、传输等等用途
-latestPhoto

获取最新照片。

static latestPhoto(): Promise<Image>

从您的照片库中读取最新照片。如果没有可用的照片,则承诺将被拒绝。

-latestScreenshot

获取最新截图。

static latestScreenshot(): Promise<Image>

从您的照片库中读取最新的屏幕截图。如果没有可用的屏幕截图,则 Promise 将被拒绝。

Pasteboard

复制并粘贴字符串或图像。

从粘贴板复制和粘贴字符串和图像。

-copy

将字符串复制到粘贴板。

static copy(string: string)

-paste

从粘贴板粘贴字符串。

static paste(): string

-copyImage

将图像复制到粘贴板。

static copyImage(image: Image)

LinearGradient

线性渐变。

要在小部件中使用的线性渐变。

-colors

渐变的颜色。

locations颜色数组应包含与渐变属性相同数量的元素。

colors: [Color]

类似css中linear-gradient属性的第二、三个从参数,表示渐变的颜色范围

1
2
3
.horizontal-gradient {
background: linear-gradient(to right, blue, pink);
}
-locations

每种颜色的位置。

每个位置应该是 0 到 1 范围内的值,并指示渐变colors数组中每种颜色的位置。

colors位置数组应包含与渐变属性相同数量的元素。

locations: [number]

1
2
3
4
5
6
7
const bg = new LinearGradient()
bg.locations = [0, 1]
bg.colors = [
new Color('#f35942', 1),
new Color('#e92d1d', 1)
]
w.backgroundGradient = bg

FileManager

此api适用于做缓存数据用,比较常用的api之一,使用频次较高

-local

创建一个本地 FileManager。

static local(): FileManager

创建一个文件管理器,用于操作本地存储的文件。

1
const files = FileManager.local();
-iCloud

创建一个 iCloud 文件管理器。

static iCloud(): FileManager

创建一个文件管理器,用于操作存储在 iCloud 中的文件。必须在设备上启用 iCloud 才能使用它。

-read

将文件的内容作为数据读取。

read(filePath: string): Data

读取文件路径指定的文件内容作为原始数据。要将文件作为字符串readString(filePath)读取,请参见并将其作为图像读取,请参见readImage(filePath).

如果文件不存在或存在于 iCloud 但尚未下载,该函数将出错。用于fileExists(filePath)检查文件是否存在并downloadFileFromiCloud(filePath)下载文件。请注意,调用 始终是安全的downloadFileFromiCloud(filePath),即使文件本地存储在设备上。

-readImage

将文件的内容作为图像读取。

readImage(filePath: string): Image

读取文件路径指定的文件内容并将其转换为图像。

1
2
// 读取自己在本地缓存的图片
const img = files.readImage(files.joinPath(files.documentsDirectory(), "avatar.jpg"))
-write

将数据写入文件。

write(filePath: string, content: Data)

-writeImage

将图像写入文件。

writeImage(filePath: string, image: Image)

将图像写入磁盘上的指定文件路径。如果该文件尚不存在,则会创建该文件。如果文件已经存在,则文件的内容将被新内容覆盖。

-fileExists

检查文件是否存在。

fileExists(filePath: string): bool

检查文件是否存在于指定的文件路径中。在移动或复制到目标之前检查这一点可能是一个好主意,因为这些操作将替换目标文件路径中的任何现有文件。

-documentsDirectory

文档目录的路径。

documentsDirectory(): string

用于检索文档目录的路径。您的脚本存储在此目录中。如果您启用了 iCloud,您的脚本将存储在 iCloud 的文档目录中,否则它们将存储在本地文档目录中。该目录可用于长期存储。可以使用“文件”应用程序访问存储在此目录中的文档。存储在本地文档目录中的文件不会出现在“文件”应用程序中。

-joinPath

连接两个路径组件。功能同node中的joinPath

joinPath(lhsPath: string, rhsPath: string): string

连接两条路径以创建一条路径。例如,用文件名连接到目录的路径。这是创建传递给 FileManager 的读取和写入函数的新文件路径的建议方法。

封装常用方法

网络请求

1
2
3
4
5
6
7
8
9
10
11
12
13
14
15
16
17
18
19
20
21
22
23
24
25
26
27
28
/**
* HTTP 请求接口
* @param {string} url 请求的url
* @param {bool} json 返回数据是否为 json,默认 true
* @param {bool} useCache 是否采用离线缓存(请求失败后获取上一次结果),
* @return {string | json | null}
*/
async httpGet(url, json = true, useCache = false) {
let data = null
const cacheKey = this.md5(url)
if (useCache && Keychain.contains(cacheKey)) {
let cache = Keychain.get(cacheKey)
return json ? JSON.parse(cache) : cache
}
try {
let req = new Request(url)
data = await (json ? req.loadJSON() : req.loadString())
} catch (e) {}
// 判断数据是否为空(加载失败)
if (!data && Keychain.contains(cacheKey)) {
// 判断是否有缓存
let cache = Keychain.get(cacheKey)
return json ? JSON.parse(cache) : cache
}
// 存储缓存
Keychain.set(cacheKey, json ? JSON.stringify(data) : data)
return data
}

获取远程图片

1
2
3
4
5
6
7
8
9
10
11
12
13
14
15
16
17
18
19
20
21
22
23
/**
* 获取远程图片内容
* @param {string} url 图片地址
* @param {bool} useCache 是否使用缓存(请求失败时获取本地缓存)
*/
async getImageByUrl(url, useCache = true) {
const cacheKey = this.md5(url)
const cacheFile = FileManager.local().joinPath(FileManager.local().temporaryDirectory(), cacheKey)
// 判断是否有缓存
if (useCache && FileManager.local().fileExists(cacheFile)) {
return Image.fromFile(cacheFile)
}
try {
const req = new Request(url)
const img = await req.loadImage()
// 存储到缓存
FileManager.local().writeImage(cacheFile, img)
return img
} catch (e) {
// 没有缓存+失败情况下,返回自定义的绘制图片(红色背景)
throw new Error('加载图片失败');
}
}

带透明度的背景图

1
2
3
4
5
6
7
8
9
10
11
12
13
14
async function shadowImage(img) {
let ctx = new DrawContext()
// 把画布的尺寸设置成图片的尺寸
ctx.size = img.size
// 把图片绘制到画布中
ctx.drawImageInRect(img, new Rect(0, 0, img.size['width'], img.size['height']))
// 设置绘制的图层颜色,为半透明的黑色
ctx.setFillColor(new Color('#000000', 0.5))
// 绘制图层
ctx.fillRect(new Rect(0, 0, img.size['width'], img.size['height']))

// 导出最终图片
return await ctx.getImage()
}

获取时间差

1
2
3
4
5
6
7
8
9
10
11
12
function getDistanceSpecifiedTime(dateTime) {
// 指定日期和时间
var EndTime = new Date(dateTime);
// 当前系统时间
var NowTime = new Date();
var t = EndTime.getTime() - NowTime.getTime();
var d = Math.floor(t / 1000 / 60 / 60 / 24);
var h = Math.floor(t / 1000 / 60 / 60 % 24);
var m = Math.floor(t / 1000 / 60 % 60);
var s = Math.floor(t / 1000 % 60);
return d;
}

所有支持的手机小物件像素大小和位置

常用来设置伪透明背景

1
2
3
4
5
6
7
8
9
10
11
12
13
14
15
16
17
18
19
20
21
22
23
24
25
26
27
28
29
30
31
32
33
34
35
36
37
38
39
40
41
42
43
44
45
46
47
48
49
50
51
52
53
54
55
56
57
58
59
60
61
62
63
64
65
66
67
68
69
70
71
72
73
74
75
76
77
78
79
80
81
82
83
84
85
86
87
88
89
90
91
92
93
94
95
96
97
98
99
100
101
102
103
104
105
106
107
108
109
110
111
112
113
114
115
// Pixel sizes and positions for widgets on all supported phones.
function phoneSizes() {
let phones = {
// 12 and 12 Pro
"2532": {
small: 474,
medium: 1014,
large: 1062,
left: 78,
right: 618,
top: 231,
middle: 819,
bottom: 1407
},

// 11 Pro Max, XS Max
"2688": {
small: 507,
medium: 1080,
large: 1137,
left: 81,
right: 654,
top: 228,
middle: 858,
bottom: 1488
},

// 11, XR
"1792": {
small: 338,
medium: 720,
large: 758,
left: 54,
right: 436,
top: 160,
middle: 580,
bottom: 1000
},


// 11 Pro, XS, X
"2436": {
small: 465,
medium: 987,
large: 1035,
left: 69,
right: 591,
top: 213,
middle: 783,
bottom: 1353
},

// Plus phones
"2208": {
small: 471,
medium: 1044,
large: 1071,
left: 99,
right: 672,
top: 114,
middle: 696,
bottom: 1278
},

// SE2 and 6/6S/7/8
"1334": {
small: 296,
medium: 642,
large: 648,
left: 54,
right: 400,
top: 60,
middle: 412,
bottom: 764
},


// SE1
"1136": {
small: 282,
medium: 584,
large: 622,
left: 30,
right: 332,
top: 59,
middle: 399,
bottom: 399
},

// 11 and XR in Display Zoom mode
"1624": {
small: 310,
medium: 658,
large: 690,
left: 46,
right: 394,
top: 142,
middle: 522,
bottom: 902
},

// Plus in Display Zoom mode
"2001" : {
small: 444,
medium: 963,
large: 972,
left: 81,
right: 600,
top: 90,
middle: 618,
bottom: 1146
}
}
return phones
}

获取截图中的组件剪裁图

1
2
3
4
5
6
7
8
9
10
11
12
13
14
15
16
17
18
19
20
21
22
23
24
25
26
27
28
29
30
31
32
33
34
35
36
37
38
39
40
41
42
43
44
45
46
47
48
49
50
51
52
53
54
55
56
57
58
59
60
61
62
63
64
65
66
67
68
69
70
71
72
73
74
75
76
77
78
79
80
81
82
83
84
85
86
87
88
89
90
91
92
93
94
95
96
97
98
99
100
101
102
103
104
105
106
107
108
109
110
111
112
113
114
115
116
117
118
119
120
121
122
123
124
125
126
127
128
129
130
131
132
133
134
135
136
137
138
139
140
141
142
143
144
145
146
147
148
149
150
151
152
153
154
155
156
157
158
159
160
161
162
163
164
165
166
167
168
169
170
171
172
173
174
175
176
177
178
179
180
181
182
183
184
185
186
187
188
189
190
191
192
193
194
195
196
197
198
199
200
201
202
203
204
205
206
/**
* 获取截图中的组件剪裁图
* 可用作透明背景
* 返回图片image对象
* 代码改自:https://gist.github.com/mzeryck/3a97ccd1e059b3afa3c6666d27a496c9
* @param {string} title 开始处理前提示用户截图的信息,可选(适合用在组件自定义透明背景时提示)
*/
async getWidgetScreenShot (title = null) {
// Generate an alert with the provided array of options.
async function generateAlert(message,options) {

let alert = new Alert()
alert.message = message

for (const option of options) {
alert.addAction(option)
}

let response = await alert.presentAlert()
return response
}

// Crop an image into the specified rect.
function cropImage(img,rect) {

let draw = new DrawContext()
draw.size = new Size(rect.width, rect.height)

draw.drawImageAtPoint(img,new Point(-rect.x, -rect.y))
return draw.getImage()
}

async function blurImage(img,style) {
const blur = 150
const js = `
var mul_table=[512,512,456,512,328,456,335,512,405,328,271,456,388,335,292,512,454,405,364,328,298,271,496,456,420,388,360,335,312,292,273,512,482,454,428,405,383,364,345,328,312,298,284,271,259,496,475,456,437,420,404,388,374,360,347,335,323,312,302,292,282,273,265,512,497,482,468,454,441,428,417,405,394,383,373,364,354,345,337,328,320,312,305,298,291,284,278,271,265,259,507,496,485,475,465,456,446,437,428,420,412,404,396,388,381,374,367,360,354,347,341,335,329,323,318,312,307,302,297,292,287,282,278,273,269,265,261,512,505,497,489,482,475,468,461,454,447,441,435,428,422,417,411,405,399,394,389,383,378,373,368,364,359,354,350,345,341,337,332,328,324,320,316,312,309,305,301,298,294,291,287,284,281,278,274,271,268,265,262,259,257,507,501,496,491,485,480,475,470,465,460,456,451,446,442,437,433,428,424,420,416,412,408,404,400,396,392,388,385,381,377,374,370,367,363,360,357,354,350,347,344,341,338,335,332,329,326,323,320,318,315,312,310,307,304,302,299,297,294,292,289,287,285,282,280,278,275,273,271,269,267,265,263,261,259];var shg_table=[9,11,12,13,13,14,14,15,15,15,15,16,16,16,16,17,17,17,17,17,17,17,18,18,18,18,18,18,18,18,18,19,19,19,19,19,19,19,19,19,19,19,19,19,19,20,20,20,20,20,20,20,20,20,20,20,20,20,20,20,20,20,20,21,21,21,21,21,21,21,21,21,21,21,21,21,21,21,21,21,21,21,21,21,21,21,21,21,21,21,22,22,22,22,22,22,22,22,22,22,22,22,22,22,22,22,22,22,22,22,22,22,22,22,22,22,22,22,22,22,22,22,22,22,22,22,22,23,23,23,23,23,23,23,23,23,23,23,23,23,23,23,23,23,23,23,23,23,23,23,23,23,23,23,23,23,23,23,23,23,23,23,23,23,23,23,23,23,23,23,23,23,23,23,23,23,23,23,23,23,23,24,24,24,24,24,24,24,24,24,24,24,24,24,24,24,24,24,24,24,24,24,24,24,24,24,24,24,24,24,24,24,24,24,24,24,24,24,24,24,24,24,24,24,24,24,24,24,24,24,24,24,24,24,24,24,24,24,24,24,24,24,24,24,24,24,24,24,24,24,24,24,24,24,24];function stackBlurCanvasRGB(id,top_x,top_y,width,height,radius){if(isNaN(radius)||radius<1)return;radius|=0;var canvas=document.getElementById(id);var context=canvas.getContext("2d");var imageData;try{try{imageData=context.getImageData(top_x,top_y,width,height)}catch(e){try{netscape.security.PrivilegeManager.enablePrivilege("UniversalBrowserRead");imageData=context.getImageData(top_x,top_y,width,height)}catch(e){alert("Cannot access local image");throw new Error("unable to access local image data: "+e);return}}}catch(e){alert("Cannot access image");throw new Error("unable to access image data: "+e);}var pixels=imageData.data;var x,y,i,p,yp,yi,yw,r_sum,g_sum,b_sum,r_out_sum,g_out_sum,b_out_sum,r_in_sum,g_in_sum,b_in_sum,pr,pg,pb,rbs;var div=radius+radius+1;var w4=width<<2;var widthMinus1=width-1;var heightMinus1=height-1;var radiusPlus1=radius+1;var sumFactor=radiusPlus1*(radiusPlus1+1)/2;var stackStart=new BlurStack();var stack=stackStart;for(i=1;i<div;i++){stack=stack.next=new BlurStack();if(i==radiusPlus1)var stackEnd=stack}stack.next=stackStart;var stackIn=null;var stackOut=null;yw=yi=0;var mul_sum=mul_table[radius];var shg_sum=shg_table[radius];for(y=0;y<height;y++){r_in_sum=g_in_sum=b_in_sum=r_sum=g_sum=b_sum=0;r_out_sum=radiusPlus1*(pr=pixels[yi]);g_out_sum=radiusPlus1*(pg=pixels[yi+1]);b_out_sum=radiusPlus1*(pb=pixels[yi+2]);r_sum+=sumFactor*pr;g_sum+=sumFactor*pg;b_sum+=sumFactor*pb;stack=stackStart;for(i=0;i<radiusPlus1;i++){stack.r=pr;stack.g=pg;stack.b=pb;stack=stack.next}for(i=1;i<radiusPlus1;i++){p=yi+((widthMinus1<i?widthMinus1:i)<<2);r_sum+=(stack.r=(pr=pixels[p]))*(rbs=radiusPlus1-i);g_sum+=(stack.g=(pg=pixels[p+1]))*rbs;b_sum+=(stack.b=(pb=pixels[p+2]))*rbs;r_in_sum+=pr;g_in_sum+=pg;b_in_sum+=pb;stack=stack.next}stackIn=stackStart;stackOut=stackEnd;for(x=0;x<width;x++){pixels[yi]=(r_sum*mul_sum)>>shg_sum;pixels[yi+1]=(g_sum*mul_sum)>>shg_sum;pixels[yi+2]=(b_sum*mul_sum)>>shg_sum;r_sum-=r_out_sum;g_sum-=g_out_sum;b_sum-=b_out_sum;r_out_sum-=stackIn.r;g_out_sum-=stackIn.g;b_out_sum-=stackIn.b;p=(yw+((p=x+radius+1)<widthMinus1?p:widthMinus1))<<2;r_in_sum+=(stackIn.r=pixels[p]);g_in_sum+=(stackIn.g=pixels[p+1]);b_in_sum+=(stackIn.b=pixels[p+2]);r_sum+=r_in_sum;g_sum+=g_in_sum;b_sum+=b_in_sum;stackIn=stackIn.next;r_out_sum+=(pr=stackOut.r);g_out_sum+=(pg=stackOut.g);b_out_sum+=(pb=stackOut.b);r_in_sum-=pr;g_in_sum-=pg;b_in_sum-=pb;stackOut=stackOut.next;yi+=4}yw+=width}for(x=0;x<width;x++){g_in_sum=b_in_sum=r_in_sum=g_sum=b_sum=r_sum=0;yi=x<<2;r_out_sum=radiusPlus1*(pr=pixels[yi]);g_out_sum=radiusPlus1*(pg=pixels[yi+1]);b_out_sum=radiusPlus1*(pb=pixels[yi+2]);r_sum+=sumFactor*pr;g_sum+=sumFactor*pg;b_sum+=sumFactor*pb;stack=stackStart;for(i=0;i<radiusPlus1;i++){stack.r=pr;stack.g=pg;stack.b=pb;stack=stack.next}yp=width;for(i=1;i<=radius;i++){yi=(yp+x)<<2;r_sum+=(stack.r=(pr=pixels[yi]))*(rbs=radiusPlus1-i);g_sum+=(stack.g=(pg=pixels[yi+1]))*rbs;b_sum+=(stack.b=(pb=pixels[yi+2]))*rbs;r_in_sum+=pr;g_in_sum+=pg;b_in_sum+=pb;stack=stack.next;if(i<heightMinus1){yp+=width}}yi=x;stackIn=stackStart;stackOut=stackEnd;for(y=0;y<height;y++){p=yi<<2;pixels[p]=(r_sum*mul_sum)>>shg_sum;pixels[p+1]=(g_sum*mul_sum)>>shg_sum;pixels[p+2]=(b_sum*mul_sum)>>shg_sum;r_sum-=r_out_sum;g_sum-=g_out_sum;b_sum-=b_out_sum;r_out_sum-=stackIn.r;g_out_sum-=stackIn.g;b_out_sum-=stackIn.b;p=(x+(((p=y+radiusPlus1)<heightMinus1?p:heightMinus1)*width))<<2;r_sum+=(r_in_sum+=(stackIn.r=pixels[p]));g_sum+=(g_in_sum+=(stackIn.g=pixels[p+1]));b_sum+=(b_in_sum+=(stackIn.b=pixels[p+2]));stackIn=stackIn.next;r_out_sum+=(pr=stackOut.r);g_out_sum+=(pg=stackOut.g);b_out_sum+=(pb=stackOut.b);r_in_sum-=pr;g_in_sum-=pg;b_in_sum-=pb;stackOut=stackOut.next;yi+=width}}context.putImageData(imageData,top_x,top_y)}function BlurStack(){this.r=0;this.g=0;this.b=0;this.a=0;this.next=null}
// https://gist.github.com/mjackson/5311256

function rgbToHsl(r, g, b){
r /= 255, g /= 255, b /= 255;
var max = Math.max(r, g, b), min = Math.min(r, g, b);
var h, s, l = (max + min) / 2;

if(max == min){
h = s = 0; // achromatic
}else{
var d = max - min;
s = l > 0.5 ? d / (2 - max - min) : d / (max + min);
switch(max){
case r: h = (g - b) / d + (g < b ? 6 : 0); break;
case g: h = (b - r) / d + 2; break;
case b: h = (r - g) / d + 4; break;
}
h /= 6;
}

return [h, s, l];
}

function hslToRgb(h, s, l){
var r, g, b;

if(s == 0){
r = g = b = l; // achromatic
}else{
var hue2rgb = function hue2rgb(p, q, t){
if(t < 0) t += 1;
if(t > 1) t -= 1;
if(t < 1/6) return p + (q - p) * 6 * t;
if(t < 1/2) return q;
if(t < 2/3) return p + (q - p) * (2/3 - t) * 6;
return p;
}

var q = l < 0.5 ? l * (1 + s) : l + s - l * s;
var p = 2 * l - q;
r = hue2rgb(p, q, h + 1/3);
g = hue2rgb(p, q, h);
b = hue2rgb(p, q, h - 1/3);
}

return [Math.round(r * 255), Math.round(g * 255), Math.round(b * 255)];
}

function lightBlur(hsl) {

// Adjust the luminance.
let lumCalc = 0.35 + (0.3 / hsl[2]);
if (lumCalc < 1) { lumCalc = 1; }
else if (lumCalc > 3.3) { lumCalc = 3.3; }
const l = hsl[2] * lumCalc;

// Adjust the saturation.
const colorful = 2 * hsl[1] * l;
const s = hsl[1] * colorful * 1.5;

return [hsl[0],s,l];

}

function darkBlur(hsl) {

// Adjust the saturation.
const colorful = 2 * hsl[1] * hsl[2];
const s = hsl[1] * (1 - hsl[2]) * 3;

return [hsl[0],s,hsl[2]];

}

// Set up the canvas.
const img = document.getElementById("blurImg");
const canvas = document.getElementById("mainCanvas");

const w = img.naturalWidth;
const h = img.naturalHeight;

canvas.style.width = w + "px";
canvas.style.height = h + "px";
canvas.width = w;
canvas.height = h;

const context = canvas.getContext("2d");
context.clearRect( 0, 0, w, h );
context.drawImage( img, 0, 0 );

// Get the image data from the context.
var imageData = context.getImageData(0,0,w,h);
var pix = imageData.data;

var isDark = "${style}" == "dark";
var imageFunc = isDark ? darkBlur : lightBlur;

for (let i=0; i < pix.length; i+=4) {

// Convert to HSL.
let hsl = rgbToHsl(pix[i],pix[i+1],pix[i+2]);

// Apply the image function.
hsl = imageFunc(hsl);

// Convert back to RGB.
const rgb = hslToRgb(hsl[0], hsl[1], hsl[2]);

// Put the values back into the data.
pix[i] = rgb[0];
pix[i+1] = rgb[1];
pix[i+2] = rgb[2];

}

// Draw over the old image.
context.putImageData(imageData,0,0);

// Blur the image.
stackBlurCanvasRGB("mainCanvas", 0, 0, w, h, ${blur});

// Perform the additional processing for dark images.
if (isDark) {

// Draw the hard light box over it.
context.globalCompositeOperation = "hard-light";
context.fillStyle = "rgba(55,55,55,0.2)";
context.fillRect(0, 0, w, h);

// Draw the soft light box over it.
context.globalCompositeOperation = "soft-light";
context.fillStyle = "rgba(55,55,55,1)";
context.fillRect(0, 0, w, h);

// Draw the regular box over it.
context.globalCompositeOperation = "source-over";
context.fillStyle = "rgba(55,55,55,0.4)";
context.fillRect(0, 0, w, h);

// Otherwise process light images.
} else {
context.fillStyle = "rgba(255,255,255,0.4)";
context.fillRect(0, 0, w, h);
}

// Return a base64 representation.
canvas.toDataURL();
`

// Convert the images and create the HTML.
let blurImgData = Data.fromPNG(img).toBase64String()
let html = `
<img id="blurImg" src="data:image/png;base64,${blurImgData}" />
<canvas id="mainCanvas" />
`

// Make the web view and get its return value.
let view = new WebView()
await view.loadHTML(html)
let returnValue = await view.evaluateJavaScript(js)

// Remove the data type from the string and convert to data.
let imageDataString = returnValue.slice(22)
let imageData = Data.fromBase64String(imageDataString)

// Convert to image and crop before returning.
let imageFromData = Image.fromData(imageData)
// return cropImage(imageFromData)
return imageFromData
}

创建弹窗

1
2
3
4
5
6
7
8
9
10
11
async function generateAlert(message, options) {
let alert = new Alert();
alert.message = message;

for (const option of options) {
alert.addAction(option);
}

let response = await alert.presentAlert();
return response;
}

弹出一个通知

1
2
3
4
5
6
7
8
9
10
11
12
13
14
/**
* 弹出一个通知
* @param {string} title 通知标题
* @param {string} body 通知内容
* @param {string} url 点击后打开的URL
*/
async notify (title, body, url, opts = {}) {
let n = new Notification()
n = Object.assign(n, opts);
n.title = title
n.body = body
if (url) n.openURL = url
return await n.schedule()
}

使用教程

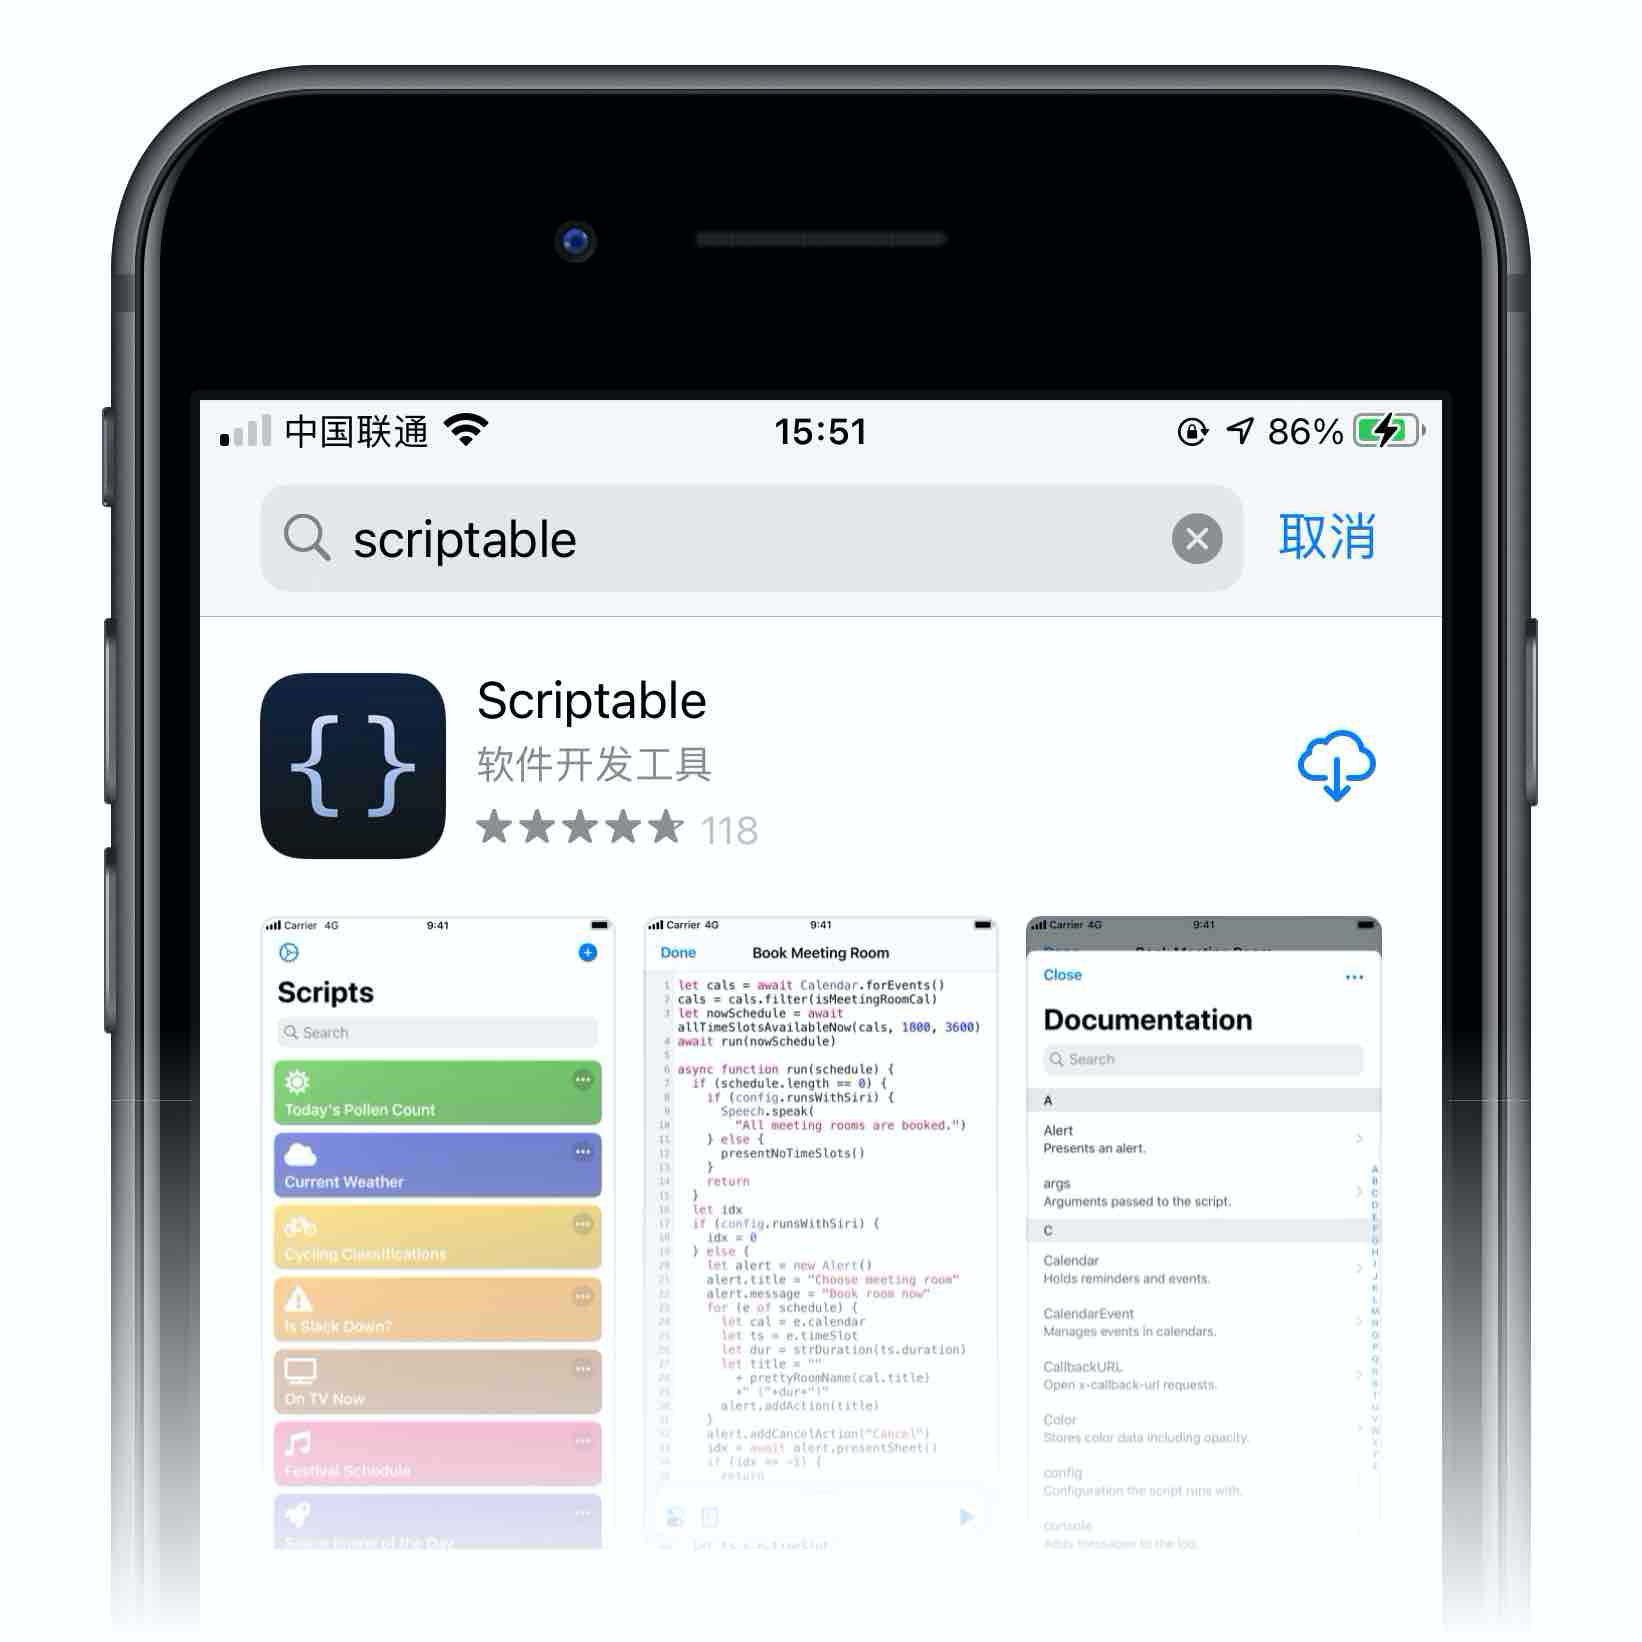
  1. AppStore搜索下载Scriptable

  1. 打开Scriptable,点击右上角➕,粘贴从小物件屋小程序里复制的安装小组件代码
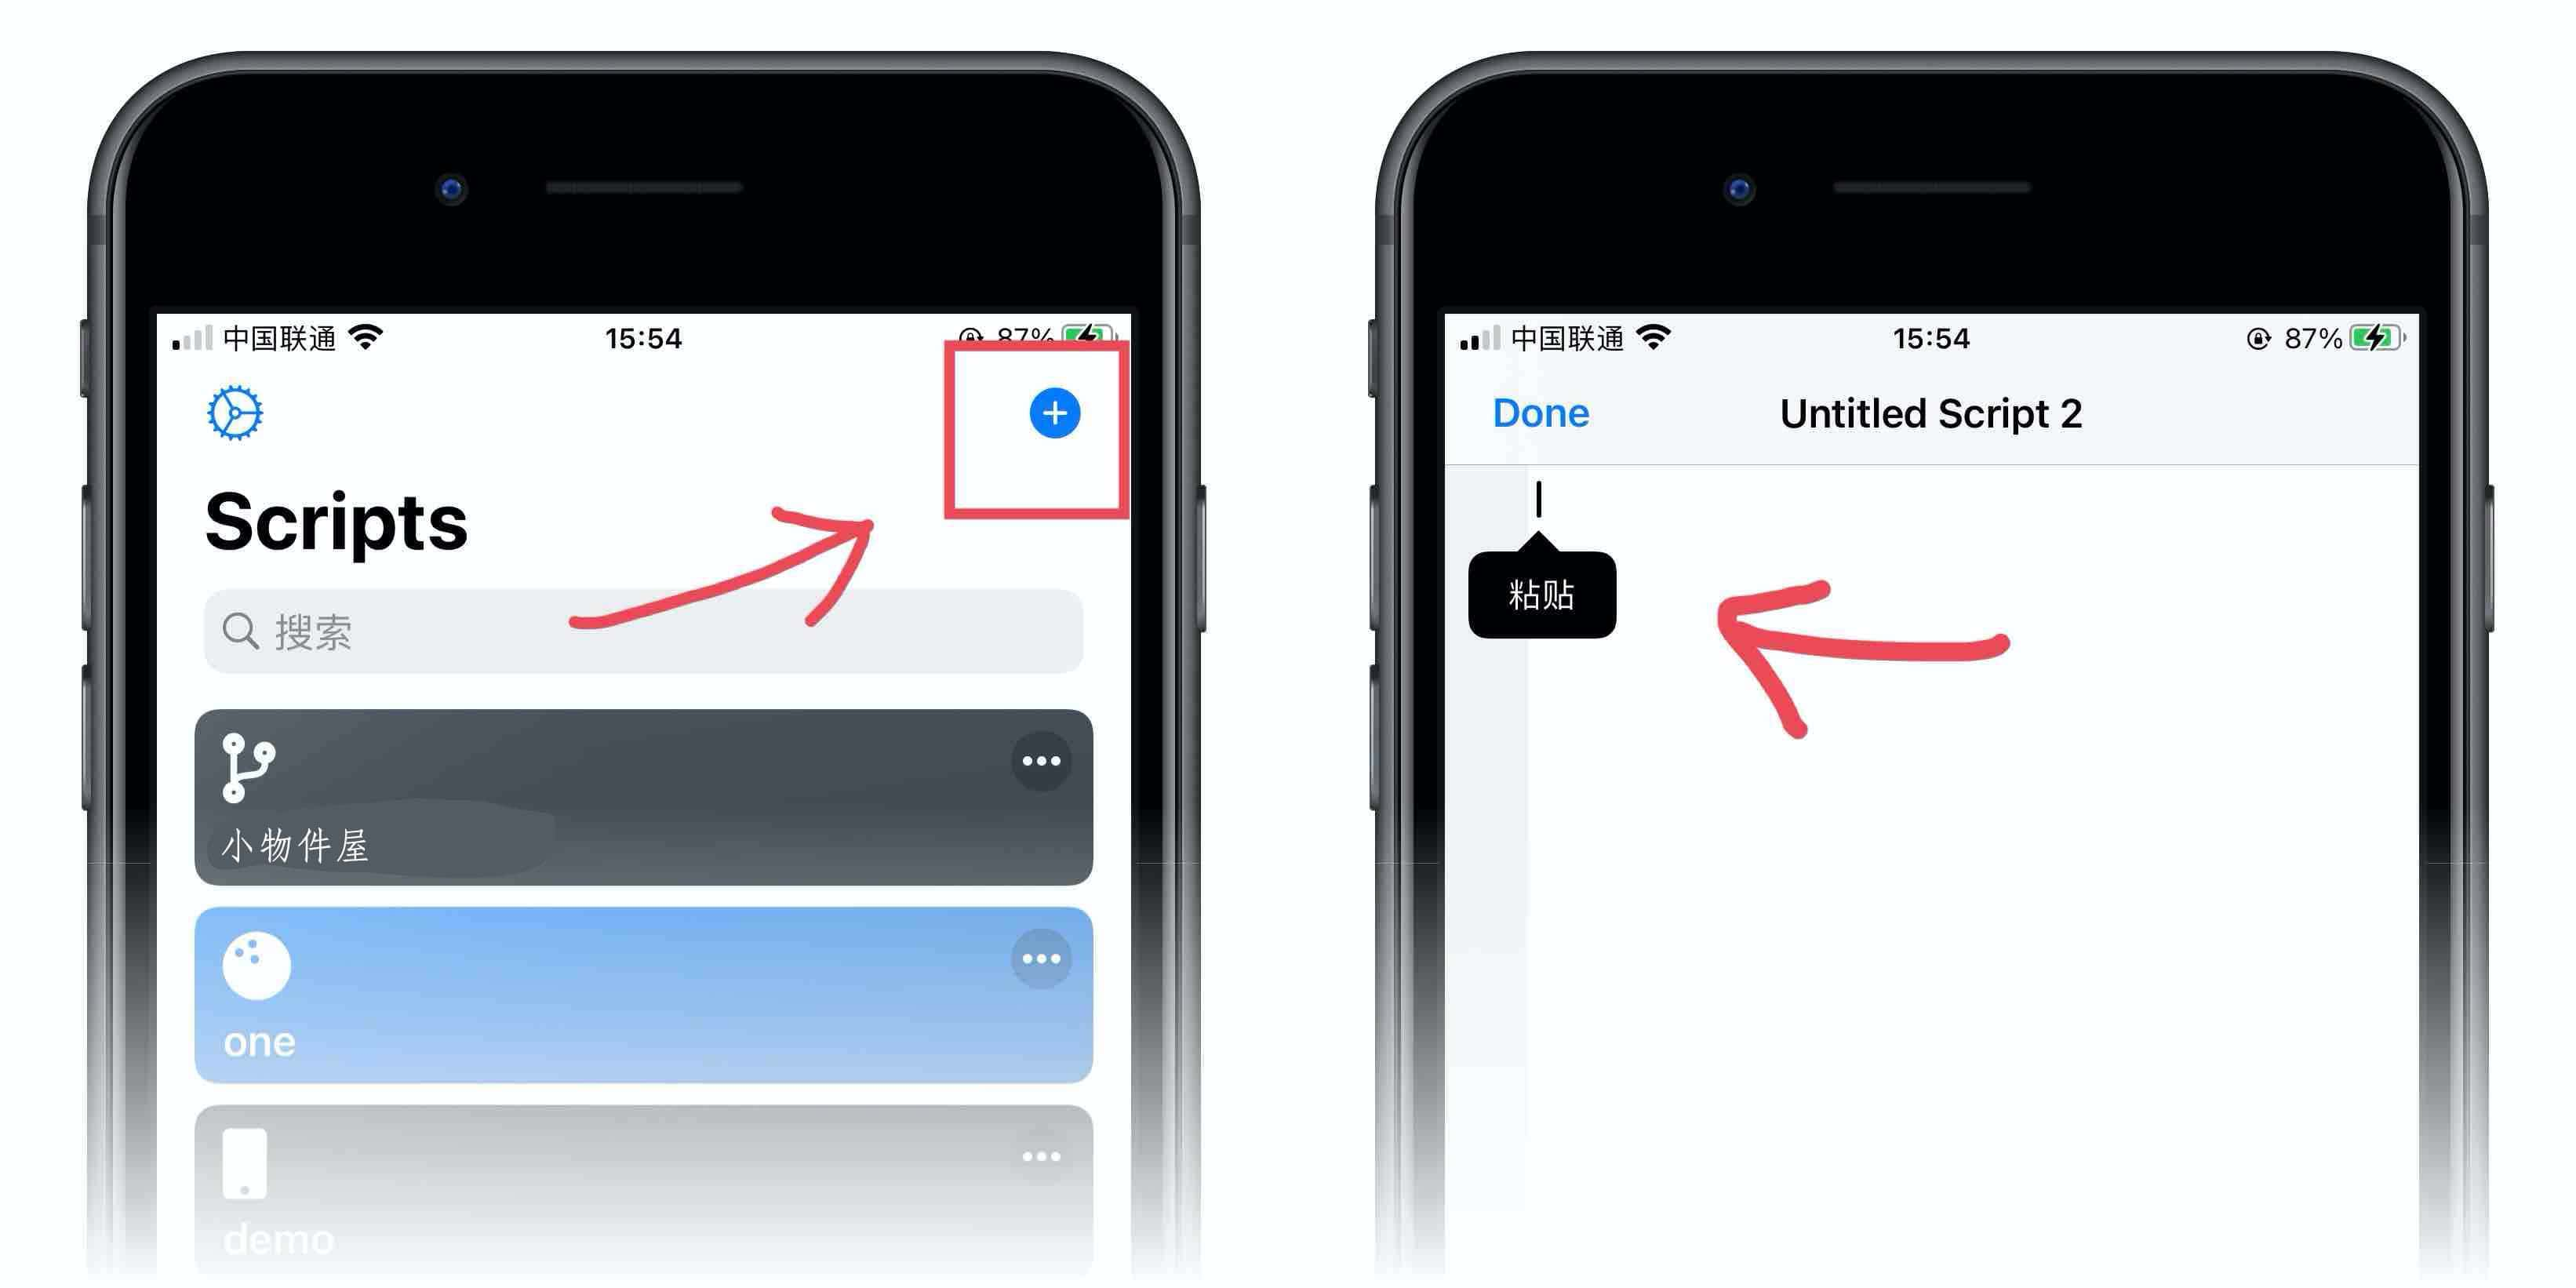
  1. 点击右下角▶️运行按钮进行下载安装组件代码,若需要配置小物件(如: 设置背景图片等),会弹出弹窗,根据提示下一步操作即可,若无任何反应则表示无需配置,接下去点击左上角的Done按钮即可

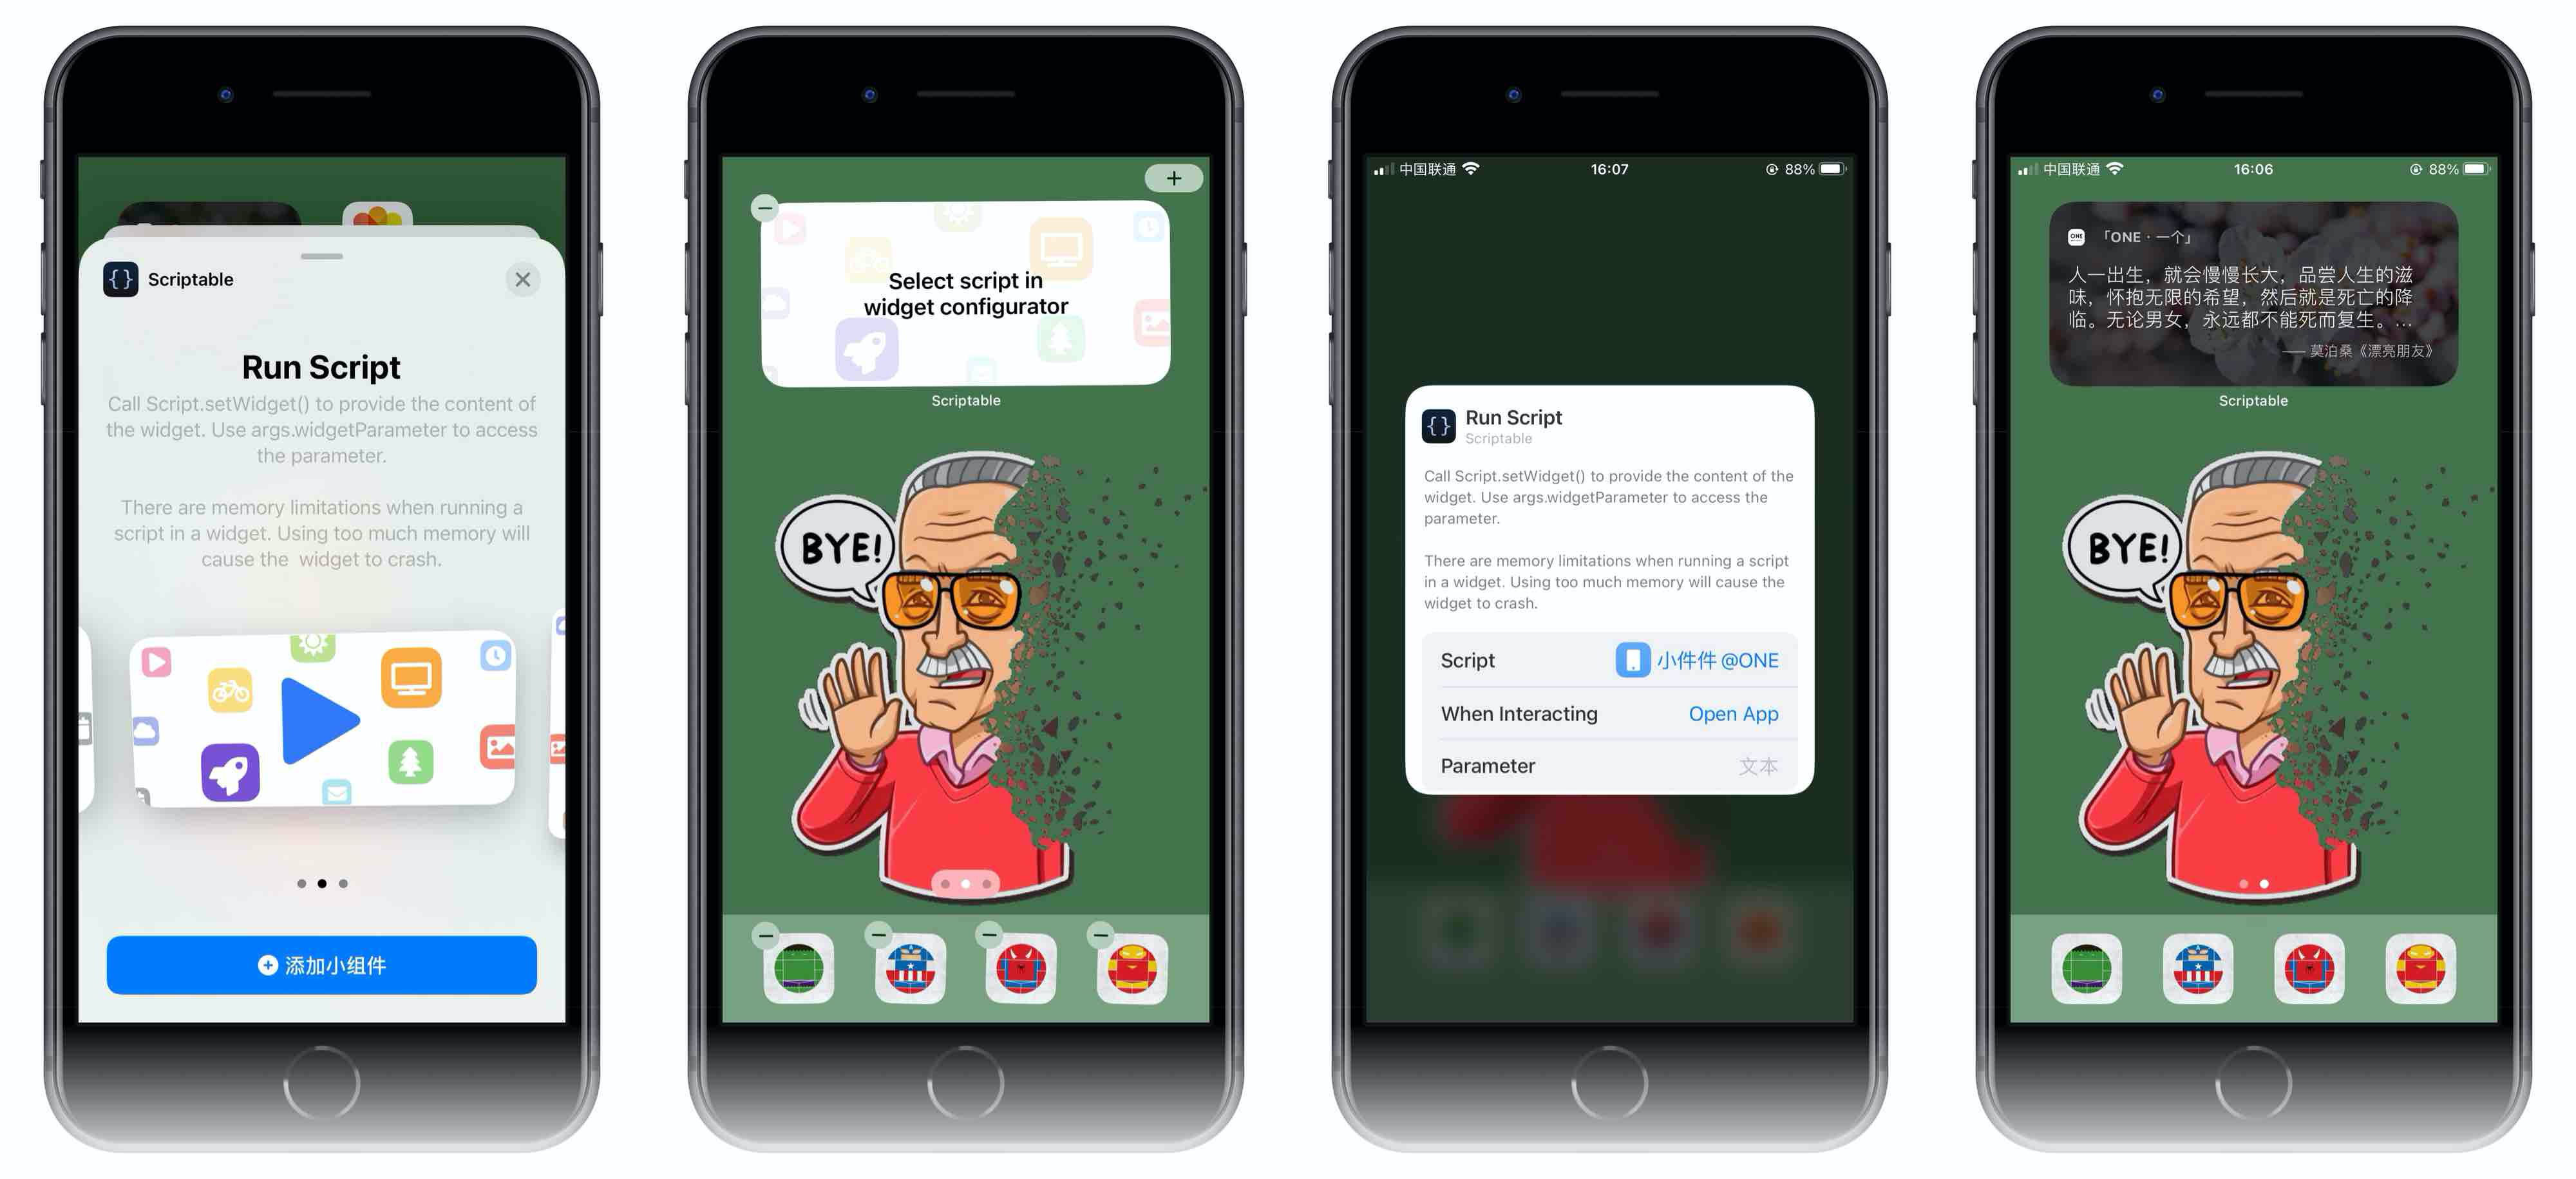
  1. 回到iPhone桌面,长按,添加组件,选择Scriptable应用,勾选刚刚添加的小组件代码,完成显示效果😃
快速通道